
Configuring motion settings
BLAZE analyzes video streams from registered cameras directly on the server to detect motion.
To configure camera motion detection settings
- Click Settings > Devices.
- On the Device settings page, select the desired camera from the device list.
- Click the Motion tab.
- Toggle Motion detection to On.
- Configure the motion detection area and exclusion area for the video.
- When finished, click Apply.
You can select multiple cameras in the device list and apply motion detection settings to all selected cameras at once.
Enabling motion detection
Set Motion detection to On to enable the configured motion detection areas and motion exclusion areas. If motion detection is not enabled, the detailed settings are not displayed.
Enabling server-side motion detection
All cameras registered in BLAZE (including SUNAPI and ONVIF devices) use server-side motion detection. This feature detects motion by analyzing video streams directly on the server rather than relying on the camera's built-in motion detection settings.
Motion areas
Add areas in the video where motion should be detected. Motion areas are numbered in the order they are added. The number of areas you can add depends on the camera's specifications.
- Click Add motion area.
- Click or drag on the video to create an area.
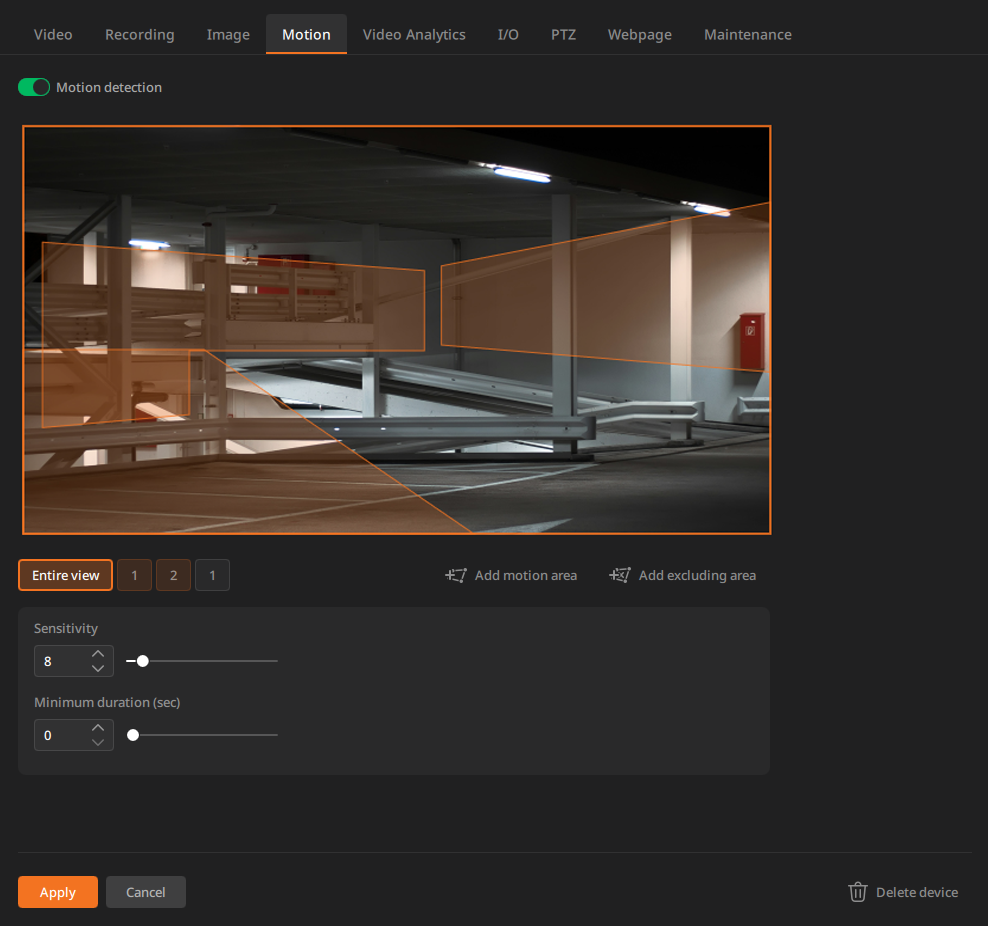
- Click to add vertices. After adding vertices to outline the area, double-click or click the starting point to complete the area.
- To move a vertex, drag it to the desired position. Only one vertex can be moved at a time.
- Click the midpoint between two vertices to add a new vertex. You can move vertices to reshape the polygon; the polygon can have up to 8 sides.
- To resize the entire area, drag the polygon edge.
- To delete a vertex, select it and either right-click and choose Delete vertex or press the Delete key.
- Set the sensitivity and minimum duration for the motion area.
- Sensitivity: Set sensitivity from 1–100.
- Higher sensitivity may detect unreliable objects that blend with the background. Lower sensitivity triggers events only for more distinct objects.
- Minimum duration (sec): Set the minimum continuous detection time. An event triggers only if motion persists for the configured duration (0–5 seconds).
- Object types: Select the object types to detect. Multiple types can be selected. Note: Object type options are enabled only when the WiseAI application is installed on the device. The available types and options vary by camera model and the WiseAI application version.
- Sensitivity: Set sensitivity from 1–100.
- Click Apply.
Excluding areas
Use excluding areas to ignore motion in locations with moving trees or where privacy must be protected. Motion events detected inside excluding areas are ignored, reducing false alarms and saving storage. You can add up to 8 excluding areas, numbered in the order they are added.
- Click Add excluding area.
- Click or drag on the video to create an excluding area.
- Click Apply.
Changing area settings
- Click Entire view to show all areas on the camera image.
- Select the orange number for a detection area or the white number for an excluding area to edit its settings.